Back in the early days of the Artist Health and Safety project in 2003/4, one of the models I constructed for the mobile Artist Studios was a railway-mounted vehicle (largely because I'm a railway enthusiast, and had found a book on railbus/draisines in the library).
Just a word of warning, this post especially will feature a lot of the nitty-gritty of making the models and so on, all stuff which in the future I intend to keep for the Model Making Blog which I'm in the process of reviving for after the summer, so apologies to people who just want to look at the final pictures (and who don't share my enthusiasm for making model kits or playing the 'spot the Airfix girder-bridge parts in 70's Dr Who miniature spaceships' game).
The original model was a bit of a lash-up, and played up the idea of an armoured vehicle to protect the artist in a dangerous environment. In hindsight not particularly conducive to painting large scenes with only those tiny eye-slits to look through.
Anyway, at the planning stage an idea for something a bit more 'open' was drawn, but never built. The railcar model (built crudely from card and electrical bits, around a battery-powered TT-scale underframe) was only ever photoshopped into existing scenes, and last saw the light of day in the Britannia Model Village project before it got accidentally squashed in a box of other props and disposed of.

The Open Call I'm producing the "Observe to Preserve" project for this year requires four images, so after the other three scenarios rather than have two of the tower, tracked studio, or artist on location, I thought I'd resurrect the railway-based studio idea, but build a new miniature more in line with the design of the tracked studio. And that threw up a couple of problems too- I'd struggled photoshopping the earlier model convincingly, and whilst the Tower miniature etc could be easily shot on location, the railway vehicle would need a base building which could be placed out and about for the pictures.

The above pic is a test from an earlier shoot, where a set of track bases were built which bolted together for the location shoots. Something similar would be needed here, I reckoned. I thought I'd re-use the original bases, but the problem was these are quite shallow, with visible framing underneath, as they were never intended to be photographed from the side; the whole shoot was intended to be seen from the above angle.
I did have a selection of heavier-duty plastic O-gauge track leftover from the Jabberwock project (above), and indeed the bases built for that would have been fantastically useful had they not been already recycled for another shoot (hell, it would be SO nice to have a storage facility for this sort of thing).

I got as far as making a mock-up of this when I hit a problem, with the scaling of the model. O-scale track in 1/32nd means a narrow gauge railway (not unlike the Ffestiniog Railway and the like). Now as the above shot taken in Porthmadog a few months ago demonstrates, this is a bit of a problem... The Garratt locomotive there is about the biggest narrow gauge class of loco running here in the UK, and looks somewhat top-heavy on the tracks. Approaching "Observe to Preserve" from a Sci-Fi point of view, I wanted the model I was making to be on the large side, and it would look almost comically ridiculous teetering along on O-gauge track. Which meant either building a new model with new figures in an incompatible scale, or coming up with a new solution...

That meant G-scale (garden railway size), which is pretty expensive- not many toys trains are made to that size, and using proper model railway bits would cost a fortune. However, ages ago I picked up a Postman Pat Train extremely cheaply for use as a parts donor for the Jabberwock project, for which it didn't prove suitable in the end. So the chassis could be resused here, but what it didn't come with was any track; however, again, I reckoned I could cut-and-shut the plastic O-scale track which had been used in the set for the Jabberwock models, and the fact the rails would be overgrown would hide any bodging.
At which point the idea of a 'quick build' for the project was spiralling out of control. If I hadn't been overthinking it, I probably could have just cobbled a model together in a few hours and lived with the compromises, but then what's the point in that?
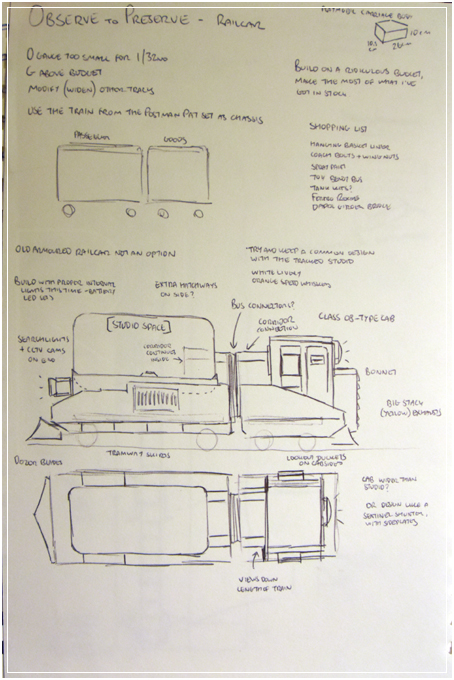
I decided the design for the Rail Studio would be a kind of compromise between the 2003-era glass box, and the armoured version, being as the fiction of "Observe to Preserve" is that the artists are operating in a post-catastrophe world of the near future, using upcycled ex-military equipment. It needed to show some sort of design heritage with the tracked mobile studio in particular, so some sketches were done. But I knew the final thing would end up being a bit more thrown together from whatever bits and pieces I had spare in the leftovers box...

As luck would have it though at this point I ended up finding on Ebay a big box of actual G-Scale track, and a couple of dirt-cheap G-Scale toy train sets on Amazon, which I'd need for a project I'm doing later in the year. Stripping the chassis from one wagon gave me a flatbed I could use (the original sketch for the articulated railcar was dropped in favour of a single unit). A quick chassis from pine stripwood was built for the chassis to attach to via a friction-fit, so the G-Scale running gear would be undamaged for the later planned shoot.


The above pictures show the sort of thing I'm talking about when I say about making the model from bits and pieces... 20 years of making miniatures for photoshoots produced lots of leftovers, along with suitable household bits. The main elements of the Rail Studio are the parts from toy tanks (ex-Britannia Model Village), the Ferrero Roche plastic tub (to match the ones used on the Tower and the Tracked Studio miniature, as the actual studio spaces), and the cab/drive unit which came from a cheap toy bulldozer. There's a few in-jokes hidden in there; for instance there are a few bits of plastic Airfix/Dapol footbridge used as detailing, because once you know what they look like they turn up everywhere in 60's-90's miniatures built for British TV science fiction shows, everything from "Thunderbirds" to "Dr.Who" to "Blakes 7" to "Terrahawks" to "Red Dwarf".


It's always a nice stage of a project where a blast of paint brings it together- grey undercoat, followed by gloss white. I followed the same deliberately restricted colour palette as the earlier models, with white as the main base, with details in boltgun metal, black, and high-vis orange. The only addition this time was yellow for the hatches and bulldozer blades, a nod to the yellow used a standard livery component on British trains until recently. As before it would be heavily weathered after the custom-designed decals were applied. The only thing I wasn't happy with was the blue-tinted glazing on the bulldozer, but I didn't have time to make new clear glazing for the model.
Of course, just having the model wasn't going to be much use, so whilst I was making this, I'd started work on the base.
I decided to build a slight improvement on something I'd created previously- an embankment with railway track on the top, on a board. Learning from those previous examples, the track on this one would be a bit higher up, the method of joining a little less obvious, and the hanging-basket liner which represents the grass made longer so it could be easier used to disguise the join between the model and real world. Size-wise, I had a long Really Useful box spare, and sized everything to fit so that I could transport it to location easier- two boards which could be bolted together for the shoot.


The basic idea was for an embankment, but I thought I'd try and make it a little more interesting for a variety of shots, as the sketch shows. A loose inspiration was Top Field at Haworth, seen in the pics above. A low, overgrown embankment, with a 'cattle-creep' type low bridge. One side of one board would have a drainage channel, which could also act as a space for an extra board to slot-into, with a station platform- at the end of that board would be a derelict bridge for a bit of interest/post apocalyptic atmosphere. The other board would have a small underbridge added part way along.

The base of each board is a piece of fibreboard, on top of which is a frame made from softwood. This was planned originally to be covered with card which would also form the shape of the embankment; it didn't need to be any more advanced, as after this shoot the softwood was needed for another project anyway, and this base couldn't be recycled for any other railway-based build/shoot because of the odd gauge of the models.
Once I'd decided to use G-scale track though, that changed things, as this base would deserve to be made a bit more robust for possible future shoots associated with the other project. So a solid ply top was attached to the frames, and the embankment sides were formed from polystyrene packing. The bridge abutments are ex-Tomy Thomas the Tank Engine items, cut up and reshaped slightly (they're already painted up from a past project- again, never throw anything away). More ply formed the drainage channel. I used the same method I'd used on the previous, O-gauge versions of the embankments, and used bolts and wing nuts (with cut-outs in the bases to allow access to the frames).
So the boards could be joined together, I made a slightly crude arrangement to use coach-bolts and wingnuts, with equally crude holes hacked in the bases to allow access. Being as I knew I'd be bolting these together on location, probably in bad weather and in a hurry, it didn't want to be anything too fancy...
The railings for the bridge sides were rebuilt from more leftovers from the Britannia project; after some debate I decided to trim off the barbed wire, because I didn't want the whole post-apocalypse business to be too overpowering in the shots. That said, I didn't end up using the railings on the bridge as clearances were too tight with the G-Scale track (when I started building the embankments I was still using the smaller width O-gauge stuff).
The hanging basket liner wasn't quite as good as I'd hoped (they seem to have changed it a bit since the Jabberwock project), but with a bit of a rough going over with a brush it starts looking a little better.
After this stage however, I changed my mind again about the obviousness of the post-apocalypse imagery. Being as this project is supposed to be set, subtly, in a post-catastrophe world I decided to include two features to hint at this- a ruined halt-type station, and a collapsed bridge.
The bridge (or one end of it at any rate) was built as a separate board which could be attached for a shoot, the same way as the main boards. The embankment only extended a short distance, and the bridge abutment was buried in the hanging basket liner.
The bridge itself was bodged from a Dapol kit of a girder bridge- deliberately chosen (based a bit on the photographs taken previously by the real girder bridge near Shipley). The choice of kit was a bit of a nod to one of the aesthetic inspirations for the project- it's an ex-Airfix design, and frankly every bit of miniature work for TV in Britain from "Thunderbirds" to "Dr.Who" has Airfix girder bridge parts pop up whenever some industrial structure needed to be built. And being as a lot of the 'look' of my project is going for the same atmosphere as those shows, it seemed a logical choice. Being as I only needed one end of a collapsed bridge, I used all the kit components to very much build a ruined structure- it would only ever be a background, slightly out-of-focus item so didn't need to be too detailed.
The ruined halt was designed to be built on a base which could be slotted-in to the drainage channel section. The platforms were actually ancient Triang 'Big Big' items which were a bit damaged anyway, with both a station building from the same set, and a shelter which had originated with a farm play set; all of these items were surviving odds and ends from the Britannia Model Village project, and with a bit of fettling (and facing the platforms with sandpaper to give a hint of concrete texture) they did the job.
So with all the models built (and indeed the paint still drying on the station set) it was off to do the actual shoots, of which more next time...